Embed KirokuForms in WordPress
Add a KirokuForms form to any WordPress page or post: paste a shortcode if you install the plugin, or paste a script tag if you would rather not install anything.
Works With Any WordPress Theme
Prerequisites
- A KirokuForms account with at least one active form
- Your form's embed snippet, copied from the KirokuForms dashboard under your form's Integrations tab
- A WordPress site where you can add custom HTML (self-hosted WordPress.org or WordPress.com Business plan or higher)
WordPress.com Free Plans
Two Ways to Add a Form
Both routes render the same form, and submissions arrive in the same place. They differ in what you paste and in what the page loads.
Not sure which? Three questions.
- Can you install plugins? WordPress.com Free and Personal plans cannot. If that is you, use the script tag.
- Do you want the form in the page itself? The plugin puts it in the page WordPress sends, so search engines can read it and it still works with JavaScript turned off. The script tag adds it once the page has loaded.
- Do you want it to open as a popup? All three can. The shortcode and the block both pick it up from the form's own settings once you have added an API key, and either one can be told to open a popup for this placement on its own. See the table below.
What each route can do
| Shortcode | Block editor | Script tag | |
|---|---|---|---|
| In the page's own HTML | Yes | Yes | No |
| Works without JavaScript | Yes | Yes | No |
| Pick a form by name | With an API key | With an API key | Not needed |
| Opens as a popup | Yes, on its own with an API key | Yes, on its own with an API key | Yes |
| Needs a plugin installed | Yes | Yes | No |
How the plugin knows a form is a popup
popup="true" to the shortcode, or set
How this form appears to Open in a popup
in the block, and either one opens a popup with no key at all. The same two
settings go the other way, with popup="false" or
Show it on the page, for putting a form you use as a
popup elsewhere into this page instead.
The shortcode, via the plugin
-
You paste
[kirokuform id="YOUR_FORM_ID"], which the Visual editor leaves alone. - WordPress fetches the form while it builds the page, so the form is in the HTML your visitor receives. It is readable by search engines, it shows up with JavaScript turned off, and the page does not shift as the form appears.
- A visitor with JavaScript turned off can send it too. The form posts to WordPress, which passes the answers to KirokuForms and returns them to the page with your thank-you message, or with anything that needs correcting marked on the field it belongs to and every answer still in place. Spam protection that uses a challenge is the exception: the challenge runs in the browser, so that visitor is asked to turn JavaScript on.
- A page with no form fetches nothing and loads nothing.
- Save a default form once and the shortcode needs no attributes at all.
- Add an API key on the settings screen and it lists your forms by name, so you pick one from a menu instead of copying an ID between tabs.
- It has to be installed, and it is not in the WordPress.org plugin directory yet.
The script tag, no plugin
- You paste the snippet from the dashboard into a Custom HTML block. Nothing is installed.
- It works on hosts that do not allow plugins, including WordPress.com Business.
- The Visual editor strips it, so it has to go in a Custom HTML block or the Text tab.
-
Each option is a
data-attribute you edit by hand on every page that has a form.
Which to choose: the script tag, if you want one form on one page today or your host does not allow plugins. The plugin, if you want the form in the page's own HTML, run several forms, or expect to move them between pages.
The Plugin and the [kirokuform] Shortcode
The KirokuForms plugin adds one block, one shortcode and one settings screen, and either one can also render as a popup, so there is no separate popup plugin to install. Submissions go to your KirokuForms account rather than into your WordPress database. What the plugin stores on your site is what you save on that screen: the optional default form, and an API key if you add one. Deleting the plugin removes both.
Getting the plugin
Already running KirokuForms Embed?
Step 1: Install and Activate
-
Go to Plugins > Add New > Upload Plugin, choose
the zip, and click Install Now. Over SFTP instead,
unzip it into
wp-content/plugins/. - Click Activate.
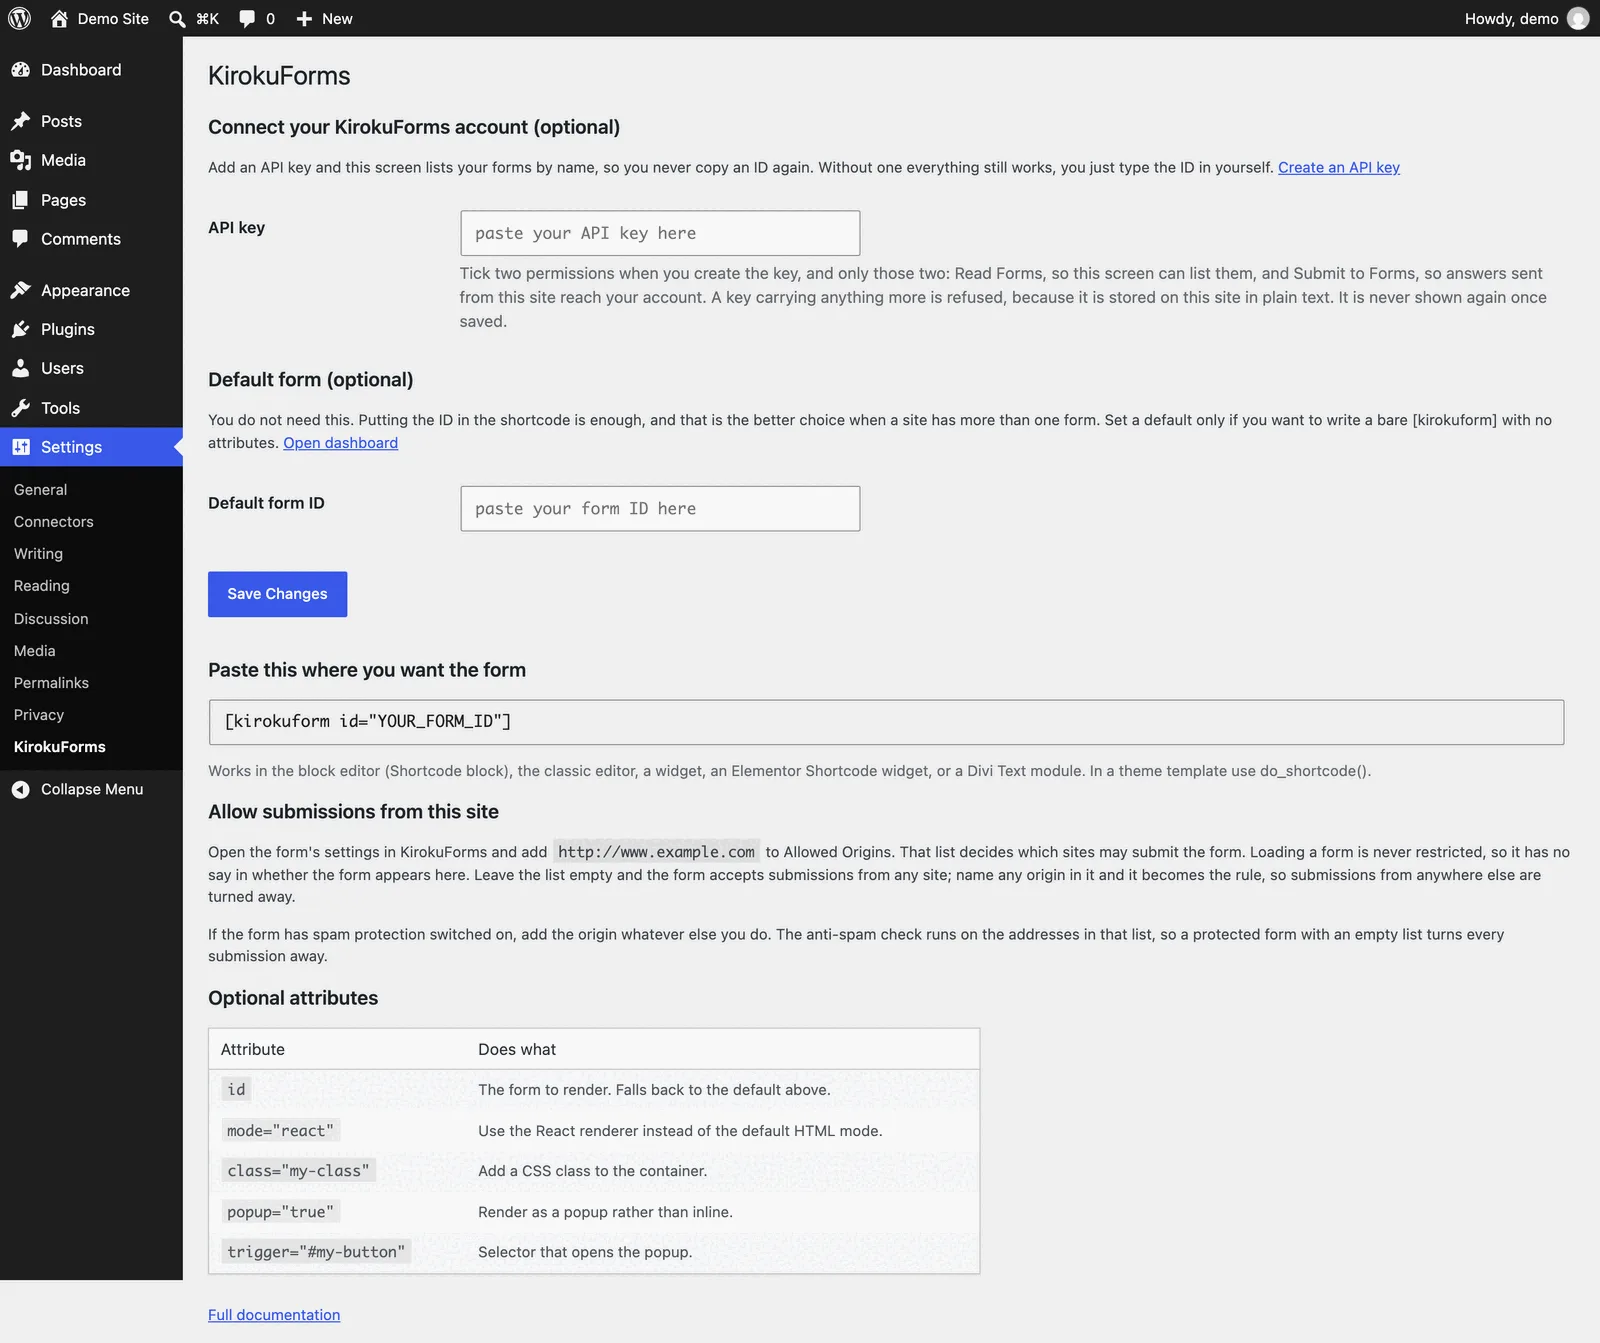
- Open Settings > KirokuForms, which shows the shortcode to copy and the exact origin to allow.
Step 2 (optional): Connect Your Account
Under Settings > KirokuForms you can paste an API key, and the screen then lists your forms by name so you pick one from a menu instead of copying an ID between tabs. Everything works without a key; you just type the ID yourself.
When you create the key in the developer settings, tick exactly two permissions and no others: Read Forms, so the screen can list them, and Submit to Forms, so answers sent from your site reach your account. A key carrying anything more is refused when you save it, and the message names what to untick. The reason is where the key lives: WordPress stores it in your site's database in plain text, where every other plugin on the site can read it, so a key that can also read your submissions would turn one compromised plugin into a copy of your leads.
Step 3: Add the Shortcode
Paste this where you want the form. Use a Shortcode block in the block editor; the classic editor, a widget, an Elementor Shortcode widget and a Divi Text module all take it as typed.
[kirokuform id="YOUR_FORM_ID"]The form ID is on the form's page in the KirokuForms dashboard. Save it under Settings > KirokuForms as the default form and the shortcode needs no attributes:
[kirokuform]In a theme template, call it through do_shortcode():
<?php echo do_shortcode('[kirokuform id="YOUR_FORM_ID"]'); ?>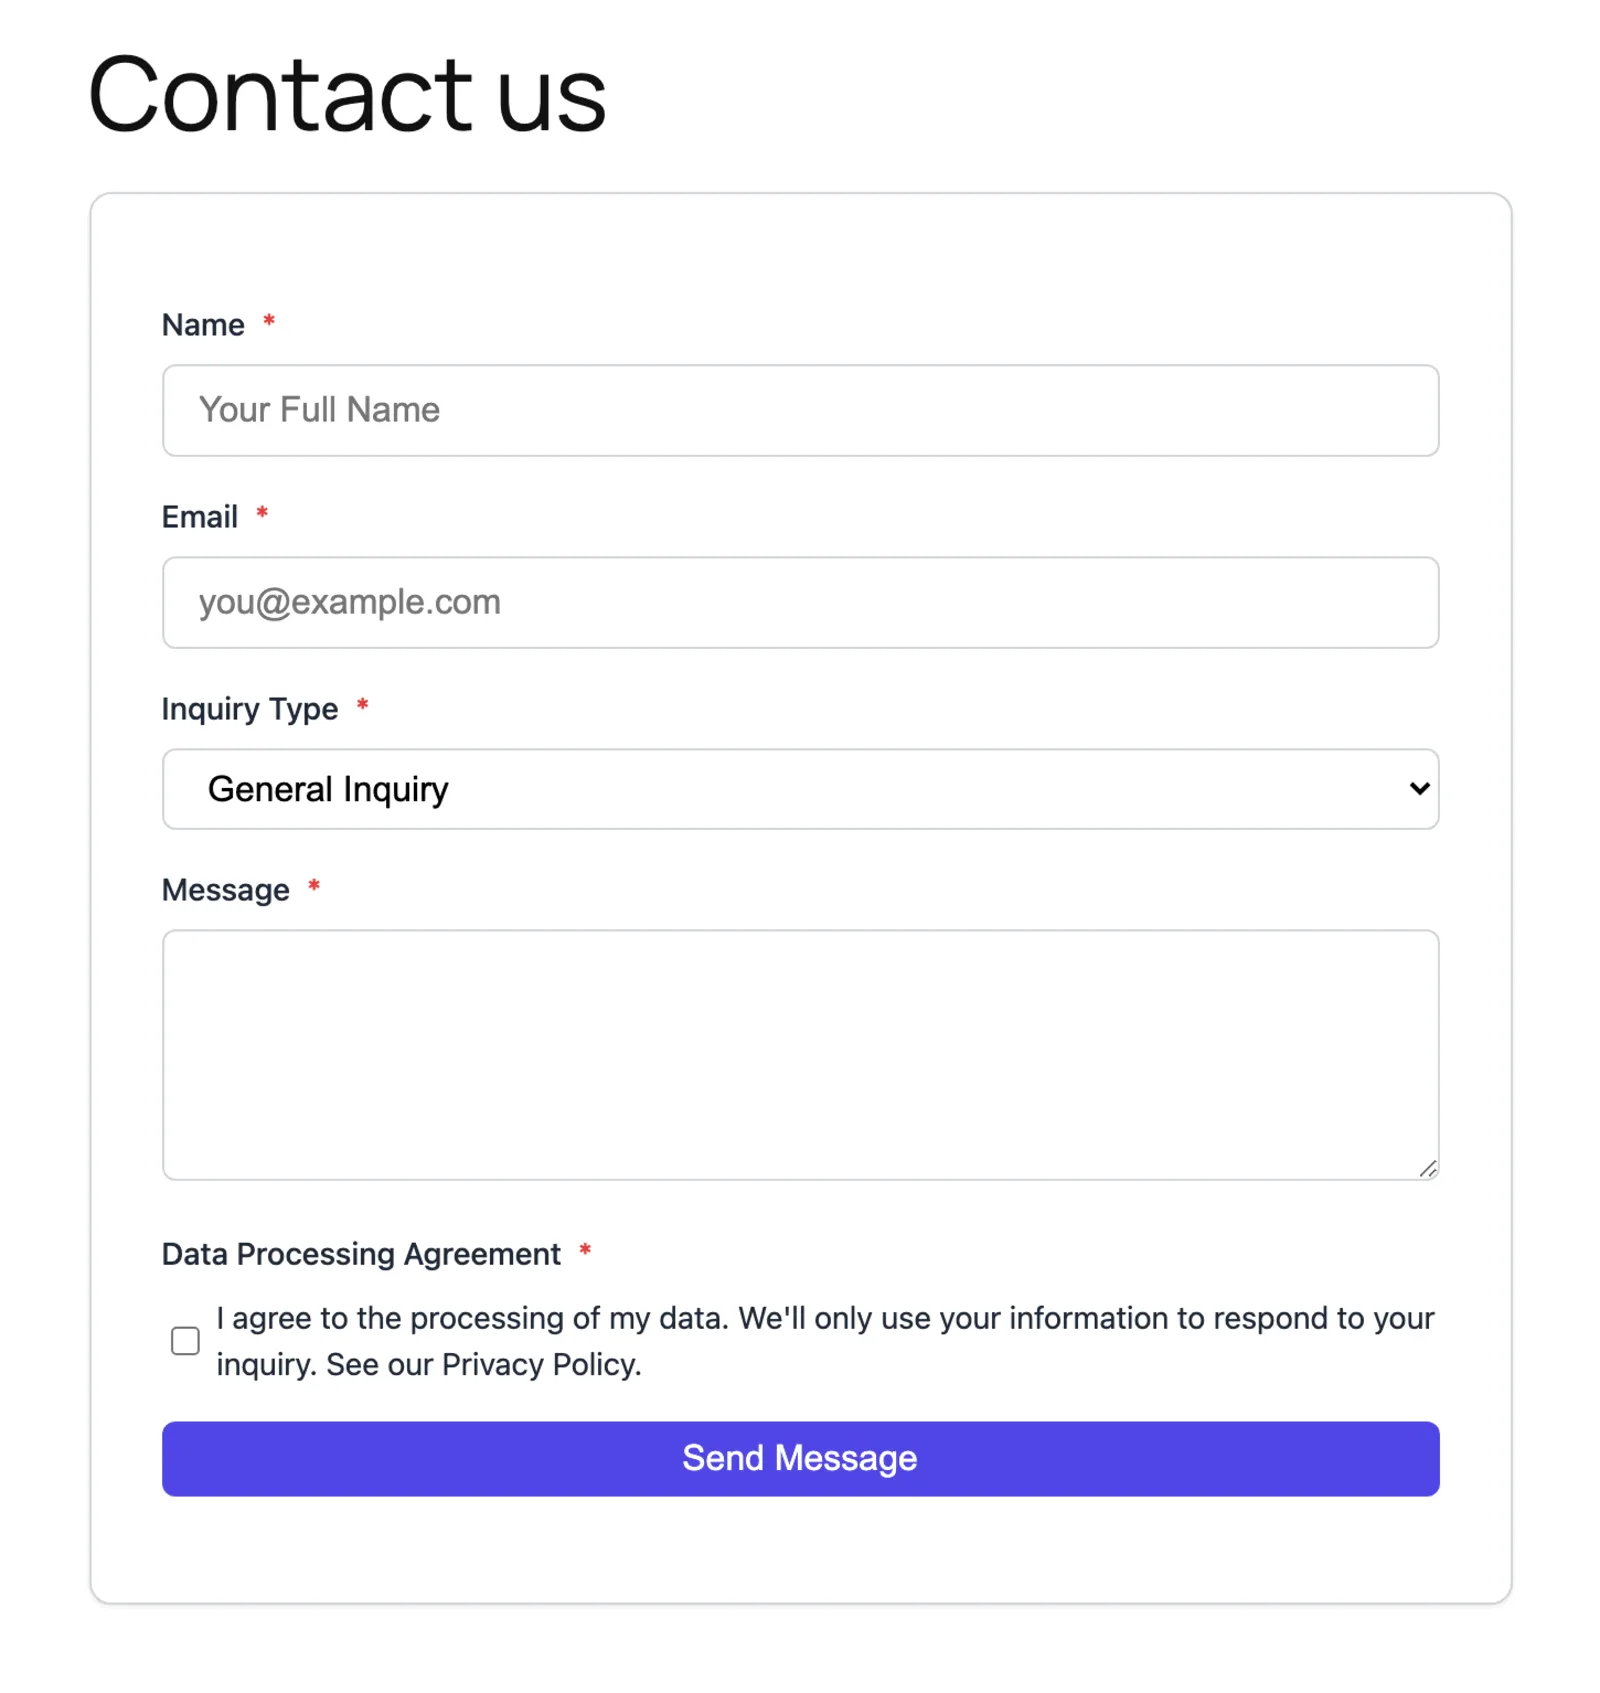
Shortcode Attributes
[kirokuform id="YOUR_FORM_ID" class="my-form"]
[kirokuform id="YOUR_FORM_ID" mode="react"]
[kirokuform id="YOUR_FORM_ID" popup="true" trigger="#open-form"]
Attribute Reference
-
id: the form to render. Falls back to the default form ID saved in Settings, so a bare[kirokuform]works once that is set. -
mode="react": render with the React renderer instead of the default HTML mode. -
class="my-form": add a CSS class to the container element, for your theme's styles to target. -
popup="true": open the form in a popup instead of rendering it in the page. You only need this if you have not added an API key, or if the form is not already set to open as a popup in KirokuForms: with a key, a form you have set as a popup opens as one here on its own. -
popup="false": the opposite, for putting a form you use as a popup elsewhere into this page instead. -
trigger="#open-form": CSS selector for the element that opens the popup.
Popups work on every plan, Free included.
Allowed Origins, and When It Matters
Allowed Origins on the form's Settings tab lists the sites that may submit the form. Loading a form is never restricted, so this setting does not decide whether the form appears. It decides whether a submission is accepted.
- Leave the list empty and the form accepts submissions from any site.
-
List any origin at all and the list becomes the rule, so add your
WordPress site's origin (
https://example.com, with thewww.if you use it) or its own submissions are turned away with "This form does not accept submissions from your domain". - If the form has spam protection switched on, list the origin whatever else you do. The anti-spam check runs on the addresses in that list, so a protected form with an empty list turns every submission away. The settings panel says so when this is the case.
Several forms on one page work the same way as with script tags: one
shortcode each, each with its own id. See
Multiple Forms on One Page.
The KirokuForms Block
With the plugin installed, the block editor has a KirokuForms block. It is the shortcode without the typing: add the block where you want the form, pick which form, publish.
- Open the page or post, click the + inserter and search for KirokuForms.
- Pick your form from the menu in the block. If you connected your account in Step 2 above, your forms are listed by name; without a key the block asks for the form ID instead.
- Optionally, open the block's settings sidebar and set How this form appears. It starts on Same as the form's own setting, so a form you later switch to a popup in KirokuForms starts opening as one here too. The other two answers, Open in a popup and Show it on the page, decide it for this page only.
- Publish or update the page.
The block and the shortcode produce the same page. Both are rendered by WordPress before the page is sent, both reuse the same five-minute cache, and a page can mix them freely. Anything already on your site keeps working: the block is an addition, and nothing about the shortcode changed.
Which one to use
Basic Embed (Block Editor)
The Block Editor (Gutenberg) is the default WordPress editor since WordPress 5.0. Follow these steps to embed your form:
Step 1: Copy Your Embed Snippet
- Go to your KirokuForms dashboard.
- Select the form you want to embed.
- Open the Integrations tab and find the Embed Snippet section.
- Click Copy to copy the snippet to your clipboard.
The snippet looks like this:
<script
  src="https://www.kirokuforms.com/embed.js"
  data-kiroku-form-id="YOUR_FORM_ID"
  async
></script>
Step 2: Add a Custom HTML Block
- Open the WordPress page or post where you want to add the form.
- Click the + block inserter and search for Custom HTML.
- Add the Custom HTML block.
- Paste the embed snippet into the block.
- Click Preview to verify the form renders correctly.
- Publish or update the page.
Preview First
Embedding in the Classic Editor
If you use the Classic Editor plugin, switch to the Text tab (not Visual) before pasting:
- Open the page or post in the Classic Editor.
- Click the Text tab in the top-right of the editor.
- Paste the embed snippet where you want the form to appear.
- Switch back to Visual to verify placement (the form will render as a placeholder in the visual editor).
- Publish or update the page.
Use the Text Tab
<script> tag. Always paste in the
Text tab.
Page Builders (Elementor, Divi, etc.)
Elementor
- Open the page in Elementor.
- Drag an HTML widget onto the page.
- Paste the embed snippet into the HTML code field.
- Save and preview.
Divi
- Open the page in Divi Builder.
- Add a Code module to your section.
- Paste the embed snippet into the code field.
- Save and preview.
Other Page Builders
Most page builders have an HTML or code block. Look for modules named Custom HTML, Code, Raw HTML, or Script. Paste the embed snippet there.
Customization Options
The embed script supports several data- attributes to customize
behavior and appearance.
Custom Theme Color
Override the primary color to match your WordPress theme:
<style>
  .kiroku-form {
    --kiroku-color-primary: #4f46e5;
  }
</style>
<script
  src="https://www.kirokuforms.com/embed.js"
  data-kiroku-form-id="YOUR_FORM_ID"
  async
></script>
Redirect After Submission
Send users to a thank-you page after they submit the form:
<script
  src="https://www.kirokuforms.com/embed.js"
  data-kiroku-form-id="YOUR_FORM_ID"
  data-kiroku-redirect="https://yoursite.com/thank-you"
  async
></script>
Inline CSS
By default the embed loads styles from an external stylesheet. Use inline CSS if your theme has strict Content Security Policy rules:
<script
  src="https://www.kirokuforms.com/embed.js"
  data-kiroku-form-id="YOUR_FORM_ID"
  data-kiroku-css="inline"
  async
></script>
Target a Specific Container
Render the form inside a specific element instead of the default location:
<div id="my-form-container"></div>
<script
  src="https://www.kirokuforms.com/embed.js"
  data-kiroku-form-id="YOUR_FORM_ID"
  data-kiroku-target="#my-form-container"
  async
></script>
React Mode
React mode renders the form dynamically on the client with a small bundled Preact runtime (~12KB gzipped, no external React download). Use it for single-page apps that build their content in JavaScript:
<script
  src="https://www.kirokuforms.com/embed.js"
  data-kiroku-form-id="YOUR_FORM_ID"
  data-kiroku-mode="react"
  async
></script>
Attribute Reference
-
data-kiroku-form-id: Required. Your form ID. -
data-kiroku-mode:html(default) orreact. -
data-kiroku-css:external(default) orinline. -
data-kiroku-redirect: URL to redirect to after submission. -
data-kiroku-target: CSS selector for the container element.
Multiple Forms on One Page
Embedding more than one form (a contact form on a page and a newsletter
in a sidebar widget, say) works the same way: add one script tag per
form, each with its own data-kiroku-form-id and
data-kiroku-target. The script is cached after the first
load, and each form is isolated with its own state and submissions.
<div id="page-form"></div>
<script src="https://www.kirokuforms.com/embed.js"
  data-kiroku-form-id="PAGE_FORM_ID"
  data-kiroku-target="#page-form"
  async></script>

<div id="sidebar-form"></div>
<script src="https://www.kirokuforms.com/embed.js"
  data-kiroku-form-id="SIDEBAR_FORM_ID"
  data-kiroku-target="#sidebar-form"
  async></script>
How It Works
-
The
embed.jsscript loads asynchronously, so it does not block your page from rendering. - It fetches your form configuration from the KirokuForms API and renders the form in the page.
- When a visitor submits the form, the data is sent directly to KirokuForms via HTTPS.
-
All configured webhooks, integrations, and approval workflows fire as
usual. The submission payload includes
"submittedVia": "embed"in the metadata:
{
  "eventType": "form.submission.new",
  "formId": "frm_abc123xyz789",
  "submissionId": "sub_def456uvw012",
  "timestamp": "2026-04-01T10:30:00Z",
  "data": {
    "name": "Arthur Dent",
    "email": "arthur.dent@example.com",
    "message": "Submitted from a WordPress page"
  },
  "metadata": {
    "submittedVia": "embed"
  }
}
CORS headers are configured to allow embedding from any origin, so the form works on any domain.
Troubleshooting
- Form does not appear: Check that you pasted the snippet
in a Custom HTML block (Block Editor) or the
Text tab (Classic Editor). The Visual editor strips
<script>tags. - The shortcode prints as text: the words
[kirokuform id="..."]appearing on the published page mean the plugin is not installed or not activated. Check Plugins. In a page builder, use its Shortcode widget rather than a text field that renders raw HTML. - Form appears but does not submit: Open the browser console (F12) and check for errors. The most common cause is an incorrect or inactive form ID.
- "This form does not accept submissions from your domain":
the form's Allowed Origins list is not empty and does
not contain this site. Add the exact origin, including
https://and anywww.. A form with spam protection switched on needs the origin listed even if you would otherwise leave the list empty. - "Script not allowed" error: WordPress.com Free and Personal plans block custom scripts. Upgrade to a Business plan or use self-hosted WordPress.
- Content Security Policy (CSP) blocking the script:
If your WordPress site has a strict CSP, add
https://www.kirokuforms.comto thescript-srcandconnect-srcdirectives. Alternatively, usedata-kiroku-css="inline"to avoid the external stylesheet request. - Form styling conflicts with theme: The embed renders inside
a scoped container with the
.kiroku-formclass. If your theme's CSS overrides form styles, usedata-kiroku-css="inline"or add custom CSS overrides using the--kiroku-color-primaryvariable. - Form loads slowly: The script is loaded with
async, so it does not block page rendering. If the form itself is slow to appear, check your network connection tokirokuforms.com.
Related Resources
- Webhooks Documentation: receive notifications when embedded forms are submitted
- API Overview: authentication, rate limits, and endpoints
- Make Integration Guide: automate workflows triggered by form submissions
- n8n Integration Guide: automate workflows with n8n
- Developer Hub